কি বোর্ড মাউস ছাড়াই রাস্পবেরি পাই সেটাপ করুন

সেই দিন আর নাই যখন রাস্পবেরি পাই ছিল দেশে রূপকথার গল্পের মত। এখন আমরা অনেকেই বিভিন্ন কাজে রাস্পবেরি পাই ব্যবহার করে থাকি। কিন্তু সমস্যাটা বাঁধে এটার সেটাপ নিয়ে। রাস্পবেরি পাই দিয়ে আমরা সাধারণত যে ধরনের কাজ গুলা করে থাকি সেগুলার জন্য এটার সাথে সর্বক্ষণ কিবোর্ড-মাউস এবং মনিটর লাগানো না থাকলেও অনেকই মনে করেই নেন যে কিবোর্ড-মাউস এবং মনিটর সরাসরি পাই এর সাথে কানেক্ট না করে পাই কনফিগার করা যায় না। কিন্তু আসলে বিষয়টা তা না। আমরা চাইলে সরাসরি পাই প্রথম বার বুট হবার আগেই কিছু জিনিস পত্র পাই এর SD কার্ডে কনফিগার করে দেবার মাধ্যমে ssh এক্সেস চালু করার পাশাপাশি চাইলে আপনার ওয়াইফাই নেটওয়ার্কেও কানেক্ট করে ফেলতে পারি। আমি হিসাব করে বলতে পারব‌ো না যে কত মানুষ মাঝ রাতে ফোন দিয় বলেছে সূর্য উঠা মাত্র একটা HDMI to VGA আর প্যাচ কেবল নিয়ে রুমে আয়। আজকে তাই ভাবলাম কিছু জ্ঞান শেয়ার করে মানুষজনের (নিজের) কষ্ট কমাই। কথা না বাড়িয়ে দেখে নেয়া যাক কি করতে হবে:

ধাপ ১: প্রথমে একটি  microSD কার্ডে পছন্দের রাস্পবিয়ান ভার্সন ফ্ল্যাশ করে নিতে হবে। সেজন্য পছন্দের যেকোন ফ্ল্যাশিং মেথড ব্যবহার করতে পারেন।  ফ্ল্যাশ করার পর সেটা কম্পিউটার থেকে খুলে নিয়ে পাই এ লাগানোর দরকার নাই, ২য় ধাপের জন্য আমাদের কার্ড কম্পিউটারের সাথে কানেক্ট করা অবস্থাতেই লাগবে। ঠিকমত ফ্ল্যাশ করা হলে, কার্ডটিতে দুইটি পার্টিশন তৈরী হবে। আমাদের সকল কাজ করতে হবে “boot” নামের পার্টিশনে।

ধাপ ২: এবার SSH এক্সেস চালু করতে হবে। সিকিউরিটির কারনে বাই ডিফল্ট রাস্পবিয়ানে কোন ইন্টারফেইস চালু করা থাকে না, হার্ডওয়ারগুলা ছাড়া। তাই আমাদেরকে SSH এক্সেস চালু করতে হবে। এটার প্রসেসটা খুবই সিম্পল, কিন্তু কিছু জিনিস মাথায় রাখতে হবে। ssh এক্সসে চালু করার জন্য আমাদেরকে ‘boot’ পার্টিশনের রুটে একটা ফাইল তৈরী করতে হবে ‘ssh’ নামে। খেয়াল করার বিষয়টা হচ্ছে ফাইলটার নাম ‘ssh’ ই হতে হবে। ‘ssh.txt’ বা অন্য কিছু হলে কিন্তু কাজ করবে না। ম্যাক বা যেকোন লিনাক্স ডিস্ট্রিবিউশনে touch ssh এই কমান্ড দিয়ে ফাঁকা ফাইলটি তৈরী করতে পারবেন। উইন্ডোজের জন্য আমি VS Code থেকে ফাইল “No Extension” হিসাবে সেভ করে ফলাফল পেয়েছি। আপনি যদি কোন কারনে ফাইলটি তৈরী করতে ব্যর্থ হন, তাহলে এখান থেকে ডাউনলোড করেও কাজ চালাতে পারবেন।

ধাপ ৩: যেহেতু আমরা কম্প্লিটলি ওয়ারলেস সেটাপ করছি তাই আমরা ল্যান কেবলের বদলে সরাসরি আমাদের ওয়ারলেস নেটওয়ার্কে আমাদের পাই কানেক্ট করে ফেলব। কাজটি খুবই সোজা, আমরা শুধুমাত্র একটি কনফিগারেশন ফাইলে আমাদের নেটওয়ার্কের ডিটেইলস বলে দিব এবং ফাইলটি  wpa_supplicant.conf নামে বুট পার্টিশনের রুটে সেইভ করব। এই ফাইলটি রাস্পবিয়ান প্রথম বুট হবার সাথে সাথেই রাস্পবেরি পাইটি আমাদের ওয়ারলেস নেটওয়ার্কে কানেক্ট করে দিবে। ফাইলটির কনটেন্ট নীচের মত:

ctrl_interface=DIR=/var/run/wpa_supplicant GROUP=netdev
update_config=1
country=<Insert country code here>
network={
ssid="<Name of your WiFi>"
psk="<Password for your WiFi>"
}

খেয়াল রাখবেন, আপনার SSID এর নাম আর PSK পাসওয়ার্ড, দুইটিই কিন্তু কেস সেন্সিটিভ। যেহেতু আমরা বাংলাদেশে আছি, তাই কান্ট্রিকোড হিসাবে BD বসিয়ে দিন। তাই ছোট হাতের ও বড় হাতের বর্ণ মিলিয়ে ফেলবেন না।

ধাপ ৪: এবার আপনার SD কার্ড টি আপনার রাস্পবেরি পাই এ লাগিয়ে পাওয়ার দিন। আপনার ওয়াইফাই রাউটারের প্যানেলে গেলেই আপনার রাস্পবেরি পাই ডিভাইসটির আইপি দেখতে পারেবন। আপনার পছন্দের ssh  ক্লায়েন্ট যেমন, PuTty বা টার্মিনালের ssh কমান্ড ব্যবহার করে আপনার ডিভাইসে লগিন করতে পারবেন রাউটারের প্যানেল থেকে পাওয়া আইপিটি ব্যবহার করে।

ধাপ ৫: sudo raspi-config কমান্ড চালিয়ে আপনি অনান্য কনফিগারেশন গুলা সম্পন্ন করে ফেলতে পারবেন। চাইলে এখান থেকে VNC সার্ভার চালু করে দিতে পারেন, তাহলে আপনি VNC Viewer ব্যবহার করে ওভার নেটওয়ার্ক গ্রাফিক্যাল ইন্টারফেইসের মাধ্যমেও কাজ করতে পারবেন।

কারও কোন প্রশ্ন থাকলে সেটা কমেন্টে জানাতে পারেন, অন্য কিছু নিয়ে জানার থাকলে সেটাও জানাতে পারেন।

টারমিনাল বা স্ক্রিপ্ট থেকে ডিফল্ট অ্যাপলিকেশনের মাধ্যমে ফাইল ওপেন করার মোটামুটি অব্যর্থ উপায়

আমরা লিনাক্স বেইজড ডিস্ট্রিবিউশন গুলা যারা চালাই তারা অনেকেই টার্মিনাল ব্যবহারে অভ্যস্ত, GUI থাকার পরেও। অধিকাংশ ক্ষেত্রেই আমাদের একাধিক অ্যাপ থাকে একই কাজের জন্য। যেমন, ভিডিও প্লেব্যাকের জন্য VLC ছাড়াও আরও অনেক অ্যাপ থাকাটা অস্বাভাবিক না। এখন আপনি হয়ত বলবেন, আমি তো appname filename.extension এই ফরম্যাটে কমান্ড দিলেই যেকোন অ্যাপলিকেশন দিয়ে ওপেন করতে পারি। হ্যাঁ, তা পারেন। তবে এটার দুইটা সমস্যা আছে।
১। অ্যাপলিকেশন ভেদে আপনি আর ঐ টার্মিনাল উইন্ডোটা ব্যবহার নাও করতে পারেন
২। আপনি যদি কোন স্ক্রিপ্টের মাধ্যমে ওপেন করতে চান তাহলে আপানর স্ক্রিপ্টের ইউজারের কাছে যে ঐ অ্যাপ থাকবে তার কোন গ্যারান্টি নাই।

মূলত দুই নং পয়েন্টটার জন্যই অধিকাংশ সময়ই ঝামেলায় পড়তে হয়। ম্যাকে open নামে একটা কমান্ড দেখে মুগ্ধ হয়ে গেছিলাম। সুন্দর মত MIME Type দেখে ডিফল্ট অ্যাপলিকেশন দিয়ে এই কমান্ডটি ফাইল ওপেন করে ফেলে। এখন প্রশ্ন আসতে পারে, ভাই MIME Type আবার কি? সংক্ষেপে উত্তর দেই আমরা সাধারণত মনে করি একটা ফাইলের মধ্যে কি আছে তা মনে হয় ফাইলের এক্সটেনশন দেখে বুঝা যায়। কিন্তু আসলে বিষয়টা তা না। আমি কোন এক্সটেনশন ছাড়াও ফাইল রাখতে পারি এবং অনেক ক্ষেত্রেই এক্সটেনশন গুলা জাস্ট কন্টেইনার হিসাবেও কাজ করে। ফাইলের ভেতরে আসলে কি ধরনের ডাটা আছে, কোন কম্প্রেশন এলগোরিদম ব্যবহার করা হয়েছে এগুলা আসলে MIME Type দেখে বোঝা যায়। যেমন, একটা ইমেজ ফাইলের MIME Type হতে পারে ‘image/jpeg’, অর্থাৎ, ফাইলটি একটা ইমেজ আর এর কম্প্রেশন অ্যালগোরিদম হচ্ছে jpeg। তো এই প্রতিটা MIME Type এর জন্য আপানর অপারেটিং সিস্টেমের একটা ডেটাবেইজ আছে, যেখানে কোন MIME Type এর ফাইল কোন অ্যাপলিকেশন দিয়ে বাই ডিফল্ট ওপেন করা হবে তার একটা লিস্ট থাকে। সুতরাং আমরা যদি ইউজারের ডিফল্ট অ্যাপলিকেশন দিয়ে ফাইল ওপেন করতে চাই, তাহলে আমাদের এই ডেটাবেইজ থেকে ইনফরমেশন নিয়ে সম্পর্কিত অ্যাপটা কল করতে হবে।

ওকে, থিউরি বুঝা শেষ। খুব পেইনের কাজ মনে হচ্ছে তাই না? আসলে না। এইসব জিনিসপত্র হ্যান্ডেল করার জন্য ডেস্কটপ লিনাক্স ডিস্ট্রিবিউশন গুলাতে xdg-utils নামে একটা প্যাকেজ থাকে (সাধারণত, আমি এখনও এই প্যাকেজ ছাড়া কোন ডিস্ট্রিবিউশন দেখি নাই। আপনার জানা থাকলে অবশ্যই জানাবেন)। এই প্যাকেজের দ্বায়িত্বই হচ্ছে ডেটাবেজ টা ম্যানেজ করা আর ডিফল্ট অ্যাপলিকেশন সেট করা। xdg-utils প্যাকেজের সাথে একটা কমান্ড আছে ‘xdg-open’ এবং আশা করি কাজ বুঝে ফেলেছেন 😉

কমান্ডটির ব্যবহার,
xdg-open filename

ব্যাস, কাজ শেষ। 🙂

মাইম টাইপের ব্যাপরে প্রথমে শিখতে হয়েছিল একটা বিশাল বাঁশ খেয়ে। শিখিয়েছিলেন, লিজেন্ড বাবর ভাই। 🙂

কারও কোন প্রশ্ন বা অন্য কিছু জানার থাকলে কমেন্ট করতে পারেন। অথবা, আমাকে মেইল করতে পারেন [email protected] এ 🙂

Huawei Honor Band 3 এর মনের ভেতর থেকে একটা রিভিউ

যখনই Honor Band 3 এর কথা উঠে, একটা কথা বারবার শুনতে হয়, সেটা হচ্ছে Color Band A2 এর ডিস্প্লে বড়, ফিচার সেটও দুই ব্যান্ডের প্রায় একই তাহলে ১ হাজার টাকা বেশি দিয়ে Honor Band 3 কেন কিনব? উত্তরটা হচ্ছে, Honor Band 3 জল নিরোধোক, এটা পুরা পানিতে চুবিয়ে দিলেও কিছু হবে না এবং এটা পরে সাঁতার দেওয়া যায়। ডিস্প্লে ছোট হওয়াই এটার চার্জও সামান্য বেশি যায়। তবে সেটা চোখে পড়ার মত কোন বিষয় না। দুই ব্যান্ড হাতে দিয়ে ব্যান্ড থ্রি আমার কাছে বেশি আরাম দায়ক মনে হয়েছে। বেশি কথা না বাড়িয়ে ভালমন্দ দিক নিয়ে বলতে চাই। অধিকাংশ জিনিসই দুই ব্যান্ডের জন্য একই হবে। তেমন তফাৎ নাই (সাঁতার আর হার্টরেট সেন্সরের কন্সিস্টেন্সি ছাড়া)।

ভাল দিক:
১। ৫০ মিটার পর্যন্ত পানি নিরোধী হওয়ায় সাঁতার ট্রাক করা যায়
২। হার্টরেট সেন্সরের একুরেসি কতটুক জানি না তবে কন্সিস্টেন্সি ভাল
৩। স্লিপ ট্র্যাকিং পার্ফমেন্স অসাধারন। আপনি সারাদিনে যেকোন সময় ঘুমাতে পারেন। এটা ট্র্যাক করবে, অত্যন্ত দক্ষতার সাথে
৪। এক ঘণ্টা বসে থাকলে ঝাঁকি দিয়ে নড়াচড়া করতে বলে
৫। নাম ও ফোন নম্বর সহ ডিস্প্লে তে নটিফিকেশন আসে, কেও ফোন দিলে
৬। কোন ফোন না ধরতে চাইলে সরাসরি ব্যান্ড থেকেই কল এবর্ট করা যায়, ফোন পকেট থেকে বের করার দরকার নাই
৭। এসএমএস ও অন্যান্য নটিফিকেশন ফুল সো করে, ফলে চাইলে ইংরেজিতে লিখা মেসেজ ব্যান্ডেই পড়ে নেওয়া যায়
৮। রেইজ টু ওয়েক ফিচার টা অস্থির কাজ করে। সামনে আনতেই ডিসপ্লে অন হয়ে যায় আবার সরানো মাত্রই বন্ধ
৯। সারাদিন হার্টরেইট মনিটরিং গ্রাফটা অস্থির লেভেলের ডিটেইলড
১০। সারাদিনে কত টুকু ঘুমানো বা হাঁটা হলো ব্যান্ডে সরাসরি দেখা যায়
১১। ব্যান্ড থেকে সরাসরি বিভিন্ন ট্র্যাকিং (দৌড়, সাঁতার, হার্টরেট) চালু করা যায়। ফোনের দরকার নাই

মন্দ দিক:
১। রোদে ডিস্প্লে দেখতে ভাল কষ্ট হয় (রাজশাহীর রোদ ভাই 🙂 রাস্তা দেখতেও কষ্ট হয়)
২। বাংলা টেক্সট রেন্ডার করতে পারে না। ফলে কেও বাংলায় মেসেজ দিলে বা কারও নাম বাংলায় সেইভ করা থাকলে সেটা দেখা যায় না
৩। অসম্ভব রকমের বাগি সফটওয়ার, এটা নিয়ে বলা শুরু করলে সারাদিনেও শেষ হবে না
৪। চার্জ ৫-৬ দিনের বেশি থাকে না, সব ফিচার ব্যবহার করলে (বিশেষ করে ট্রু স্লিপ ট্র্যাকিং)
৫। সফটওয়ারে ক্লাইম্বিং কাউন্টার থাকলেও আপনি গাছে উঠেন আর এভারেস্টের চুড়ায়, কিচ্ছু কাউন্ট হয় না (এটা সফটওয়ার ইস্যু)
৬। কল রিসিভ করার পরেও ব্যান্ডে মিসড্ কল হিসাবে সো করে এবং নতুন কোন কল আসার আগ পর্যন্ত ঐ মিসড্ কল এলার্ট উঠে থাকে (এটা সব থেকে বেশি বিরক্তিকর)
৭। Health অ্যাপ দিয়ে সরাসরি কানেক্ট না করলে ঘড়ি ১২ ঘণ্টা করা যায় না
৮। Wear অ্যাপ দিয়ে কানেক্ট করলে নটিফিকেশন ভাল মত পাওয়া যায় কিন্তু ঘড়ি ১২ ঘণ্টার করা যায় না
৯। আমার মত চামড়া পাতলা হলে ব্যান্ডটা কেটে বসে যাবে চামড়ায় আর চুলকাতে পারে। তবে এটা অন্য কারও সাথে হয়েছে বলে এখনও শুনি নাই
১০। ডিস্প্লেতে স্ক্র্যাচ পড়ে, যদিও কোথাও স্ক্রাচ রেজিস্টেন্স দাবি করা হয় নাই তারপরও এটা উল্লেখ করা ভাল
১১। দিনের ডেটা দিনে সিঙ্ক না হলে তা হারিয়ে যায়। মানে আপনি সারাদিন ফোন ছাড়া ব্যান্ড ব্যবহার করলে সব ডেটা ব্যান্ডে সেইভ থাকবে তবে অবশ্যই রাত ১১:৫৯ এর মধ্যে ফোন কানেক্ট করে সিঙ্ক করে নিতে হবে

ব্যান্ডের কোন ছবি নাই, দেখতে মন চাইলে গুগল করে দেখেন -_-

আর্ডুইনো দিয়ে AVR MCU প্রোগ্রামিং

আজকে এক ফ্রেন্ডকে AVR MCU দিয়ে প্রযেক্ট ডিপ্লয় করার কথা বললে সে উত্তর হিসাবে বলে যে, “আমি তো AVR প্রোগ্রামিং পারি না।” আমার যেহেতু এই আঙ্গনে কিঞ্চিৎ চলা ফেরা আছে, তাই আমি জানি যে AVR প্রোগ্রামিং ছাড়াই ATtiny13A, ATmega8 টাইপের চিপ গুলা প্রোগ্রাম করা যায়। এর জন্য আর্ডুইনো কোড করার জন্য যতটুকু জ্ঞান দরকার, তা থাকলেই চলে 🙂

মিছা কথা। আসলে আর্ডুইনো কোড করতে যতটুকু জ্ঞান দরকার তারথেকে একটু বেশি জ্ঞান লাগে। যেটুকু বেশি লাগে, সেটুকু নিয়েই লিখতে বসেছি।


আচ্ছা, এখন প্রশ্ন হতে পারে ৫০০ টাকা দামের একটা আর্ডুইনো উনো বোর্ডে বসিয়ে দিলেই তো হয়। স্পেশ নিয়ে সমস্যা? তাহলে আর্ডুইনো মাইক্রো দিলেই তো হয়ে যায়। তাহলে কেন মাথা নষ্ট করে স্ট্যান্ডঅ্যালোন মাইক্রোপ্রসেসর প্রোগ্রাম করতে যাব? উত্তরটা হচ্ছে পাওয়ার কনজানম্পশান। আর্ডুইনোতে পাওয়ার লস হবার অনেক কম্পোনেন্ট আছে। যেমন, আর্ডুইনো 3.3 থেকে 9 ভোল্ট পর্যন্ত পাওয়ার করা যায়। মানে বেশ কিছু ভোল্টেজ রেগুলেটর আছে। তার উপর আরও কিছু LED হ্যানত্যান আছে। সুতরাং, ব্যাটারি চালিত কোন প্রযেক্ট ডিপ্লয় করতে হলে MCU এর বিকল্প নাই 🙂


যা যা লাগবে:

১। আর্ডুইনো উনো,

২। একটা ১০ মাইক্রো ফ্যারাড ক্যাপাসিটর,

৩। যে MCU টা প্রোগ্রাম করবেন সেটা,

৪। সুবিধা মত জাম্পার ওয়ার ও

৫। বুক ভরা সাহস… (ফাইজলামি করলাম। আমার মত ফেইল করা ছাত্র পারলে যে কেও পারবে)

আচ্ছা, এইবার আসি কাজের কথায়। স্টেপ বাই স্টেপ ফলো করলেই হবে,

বিঃদ্রঃ এক্ষেত্রে আমি Arduino UNO এবং ATmega8A ব্যবহার করে উদাহরণ দিয়েছি। কেন? হাতের কাছে ছিল।  একটা ATTiny13A ও ছিল, কিন্তু পিন কম বলে ব্যবহার একটু সীমিত।

১ম স্টেপ:

এই লিংক থেকে আপনার MCU এর জন্য বোর্ড ফাইলের লিংকটি খুঁজে বের করুন এবং লিংকটি কপি করুন। যেমন, ATmega8A, ATmega328, ATmega88, ATmega168 এর জন্য লিংক হচ্ছে https://mcudude.github.io/MiniCore/package_MCUdude_MiniCore_index.json

২য় স্টেপ:

Arduino IDE ওপেন করে প্রেফারেন্সে যান। অতঃপর Additional Board Manager এর যায়গাতে আপনার কপি করা লিংকটি পেস্ট করুন এবং ওকে ক্লিক করুন।

৩য় স্টেপ:

আর্ডুইনো উনো কানেক্ট করুন এবং Arduino IDE তে File>Example>ArduinoISP>ArduinoISP স্কেচটি ওপেন করুন ও এটি আর্ডুইনো উনোতে আপলোড করুন।

৪র্থ স্টেপ:

আপনার MCU এর ডাটাশীট গুগল করে খুজে বের করুন। একটা MCU কে আর্ডুইনো দিয়ে প্রোগ্রাম করতে আমাদের ছয়টা পিনের দরকার। পিন গুলা হচ্ছে RESET, MISO, MOSI, SCK, VCC আর GND। মানে আমরা মূলত SPI বাসের মাধ্যমে MCU টির সাথে কমিউনিকেট করব এবং প্রোগ্রাম করব। বিস্তারিত চাইলেই লিখা যায় কিন্তু আগে জানতে হবে অডিয়েন্স রেডি কিনা। 😉

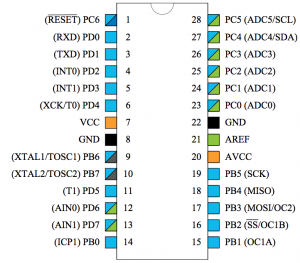
নীচের ছবিতে ATmega8A এর জন্য পিন লেআউট তুলে ধরা হল। এখানে দেখলে বুঝা যায়, PIN1 হচ্ছে RESET, PIN7 VCC, PIN8 GND, PIN19 SCK, PIN18 MISO এবং PIN17 MOSI.

৫ম স্টেপ:

এবার আমাদের MCU টিকে আর্ডুইনোর SPI বাসের সাথে কানেক্ট করতে হবে। আমরা যদি ডকুমেন্টেশন দেখি তাহলে বুঝতে পারব আর্ডুইনো উনো এর PIN13 SCK, PIN12 MISO, PIN11 MOSI এবং PIN10 SS. তারমানে দাঁড়াচ্ছে যে আর্ডুইনোর PIN13 কানেক্ট করতে হবে MCU এর SCK পিনে, এক্ষেত্রে ATMega8A এর PIN19 এ। অনুরুপ পিন গুলি কানেক্ট করতে হবে। VCC ও GND পিন কানেক্ট করতে হবে আর্ডুইনোর 5V ও GND পিন এর সাথে। PIN10 এর কাজ ব্যাখ্যা করার ধৈর্য আপাতত নাই এবং এটার বিস্তারিত আলোচনা এই আর্টিকেলের আওয়তামুক্ত বলেই মনে করি। তবে PIN10 কানেক্ট করতে হবে MCU এর রিসেট পিনে। ওহ, ভাল কথা, ১০ মাইক্রো ফ্যারাড ক্যাপাসিটরটার কথা মনে আছে? ওটাকে লাগিয়ে দিন আর্ডুইনোর RESET পিন আর GND পিনের মাঝে…

কানেকশন বুঝতে অসুবিধা হলে, এই লিংকে গেলেই হবে…


৬ষ্ঠ স্টেপ:

আচ্ছা, এবার MCU এর কোন পিন স্কেচে কি লিখতে হবে তাতো বুঝতে হবে নাকি? একটু গুগল করলেই পেয়ে যাবেন। না পেলে হিন্টস দেই, ADC গুলি হচ্ছে Analog Pin, PD গুলি Digital Pin আর OC লিখা গুলিতে আছে PWM সুবিধা। এটার জন্য একটা ছবি বানাইতে হবে, অসুবিধা হইলে কমেন্টে জানায়েন, চেষ্টা করব দ্রুত দেবার। জাতির পছন্দের D13 পিন হচ্ছে, ATmega8 এর PIN19 😉

৭ম স্টেপ:

এবার আর্ডুইনোটা পিসিতে কানেক্ট করেন। Arduino IDE এর Tools থেকে Board সিলেক্ট করেন যেটা আপনার বোর্ড, এক্ষেত্রে আমি ATmega8 সিলেক্ট করেছি। আর Programmer সিলেক্ট করেন Arduino ISP. এবার আপনি যেই স্কেচ MCU  তে বার্ন করতে চান, সেটিকে Shift চেপে রাখা অবস্থায় আপলোড করেন বা “Upload using Programmer” অপশন ব্যবহার করেও করতে পারেন। ব্যাস। কাজ শেষ -_-


কোন সমস্যা হলে, এখানে কমেন্ট করতে পারেন বা ইমেইল করতে পারেন, [email protected] এ। ফেসবুকেও মেসেজ করতে পারেন।

ধন্যবাদ সময় নিয়ে পড়ার জন্য 🙂

বাংলাদেশ, ICT শিক্ষা এবং আমার মতামত

আমার মতে, বাংলাদেশ সরকারের সব থেকে ভাল সিদ্ধান্ত গুলির মধ্যে একটা হচ্ছে ইন্টারমিডিয়েট লেভেলে ICT শিক্ষা যোগ করা। তবে আমার মনে হয় এটার ইম্প্লিমেন্টেশন হয়েছে সব থেকে বাজেভাবে।

Continue reading

Windows 10 Community Activation @RC

Mozilla is all about a movement that helps you to preserve your rights as a citizen of the Web. Recently with Windows 10, Microsoft made it quite hard to change the browser for some folks. So, Mozilla decided to throw campaign to help them.

Rajshahi College is one of the leading colleges in Rajshahi. On 11th December, 2015 me along with some of my fellow Mozillians, headed for RC to aware them about the importance of their rights as the citizen of the web and help them in case they had any difficulties with the new browser default system.

So, we headed up for the venue at 2:30PM as the event was at 3PM. After reaching the venue we set the banners up and checked the projector and sound system. The participants started to come from around 2:50. Soon, we had our expected number and we started the sessions.

First of all, I talked about Mozilla, why it’s necessary and what could happen if we didn’t have Mozilla around us. I started all the way back from the WWW and Mosaic and talked about how they made the Firefox, that we use now. I talked about the Browser Arm races, Microsoft’s evil moves to lock down the internet and all the good stuffs.

Then I asked them if there was anyone who’s default browser wasn’t Firefox, as expected, a few rose their hands, that was a fun question anyway. But when I asked if anyone of them was having any trouble with making Firefox default on Windows 10, holy, half of them raised their hands! I was quiet astonished at that moment. After hearing their experience personally, I showed them a few videos and blogs that demonstrated the process. We also distributed the copy of latest Firefox through flash drive to them who didn’t use Firefox as their default and asked them to give it a shot.

After these, we asked them a few questions, like, how many steps did it take to make Firefox the default browser, who is the inventor of WWW and many others. Based on this questioning session we gifted Love Mozilla Wristbands to those who could answer the questions correctly.

At last, we distributed the swags, the stickers and buttons and the snacks. This was a really great event, met with a few very wise and passionate men.

This event was a real blast. We opted for 60-80 people join us but 120 people joined. Though we’re not prepared for such a high number, with the help of mighty Allah, we could handle the crowd. Yet, this is the biggest Mozilla Event in Rajshahi.

PS: For my real slow net connection, I could not attach any photos to this post, but if you want, you can see them all from here.


Windows 10 community activation @RU

Mozilla is all about a movement that helps you to preserve your rights as a citizen of the Web. Recently with Windows 10, Microsoft made it quite hard to change the browser for some folks. So, Mozilla decided to throw campaign to help them.

Rajshahi University is one of the leading universities in Bangladesh. On 9th November, 2015 me along with some of my fellow Mozillians, headed for RU to aware them about the importance of their rights as the citizen of the web and help them in case they had any difficulties with the new browser default system.

So, we headed up for the venue at 2:30PM as the event was at 3PM. After reaching the venue we set the banners up and checked the projector and sound system. The participants started to come from around 2:50. Soon, we had our expected number and we started the sessions.

First of all, I talked about Mozilla, why it’s necessary and what could happen if we didn’t have Mozilla around us. I started all the way back from the WWW and Mosaic and talked about how they made the Firefox, that we use now. I talked about the Browser Arm races, Microsoft’s evil moves to lock down the internet and all the good stuffs.

Then I asked them if there was anyone who’s default browser wasn’t Firefox, as expected, a few rose their hands, that was a fun question anyway. But when I asked if anyone of them was having any trouble with making Firefox default on Windows 10, holy, half of them raised their hands! I was quiet astonished at that moment. After hearing their experience personally, I showed them a few videos and blogs that demonstrated the process. We also distributed the copy of latest Firefox through flash drive to them who didn’t use Firefox as their default and asked them to give it a shot.

After these, we asked them a few questions, like, how many steps did it take to make Firefox the default browser, who is the inventor of WWW and many others. Based on this questioning session we gifted Love Mozilla Wristbands to those who could answer the questions correctly.

At last, we distributed the swags, the stickers and buttons and the snacks. This was a really great event, met with a few very wise and passionate men.

PS: For my real slow net connection, I could not attach any photos to this post, but if you want, you can see them all from here

AppTrain VU

With the release of Firefox OS, Web App gained a new identity. Firefox OS gave Web App the honor of being able to talk with the hardware and be native apps. In general, Web Apps in Firefox OS is no different than your regular HTML5+CSS+JS built Web Apps but why special training? Well, when you’re making an app for a hand held device which can do more than just displaying a few information, you’ll need a way to communicate with the device hardware to tell it to vibrate, ring, access microphone and other crazy stuff. To do these awesome things, you’ll need something we call APIs. Mozilla has worked really hard to create some Web APIs and Firefox OS Specific APIs. People generally don’t know these APIs and they may know how to code HTML and CSS but a great part of the App is the manifest file which is OS specific. Teaching people how to write a badass manifest file is the primary object of these training.

On September 09, 2015, I along with my fellow mozillians payed a visit to Varendra University Rajshahi to introduce them Web Apps for Firefox OS.

The event was at 9AM but we reached there at 9AM, we’re lazy. Then after setting up the awesome banners and testing out the projector and sound system, we were good to go at around 9:30AM. But we’d to wait for a few more attendee. We, eventually, started at 9:45.

First, I talked about Web Apps in general, why we need them, how we’re surrounded by them and why they are important for a healthy application ecosystem.

Then, I started diving into developing Web Apps for Firefox OS. First I showed them how the WebIDE can help them and what the interface looks like. After that we together created the very first manifest file.

After the manifest file, they went brainstorming so that they could create something that they. Many of them came with awesome ideas but only a few could be done on spot. A group created a demo app for managing classes. Bravo!

Then we had our lunch.

After lunch, the participants did some practice on what they learned and then we started talking about APIs and why they’re a big deal.

After messing around APIs a little bit and installing apps on device just for fun, we started the Q/A session. The participants really had a few awesome questions.

Last but not least, this event really went well and I’m thinking to re visit them soon enough.

Webmaker Kiosk at BIW2015, Rajshahi

[[Disclaimer: This blog is written for those who can not wait to know how the event went. This contain no photos, as I don’t have them right now and barely contains any link. To see the final version, you have to wait a few days.]]

Bangladesh is a developing country. The current Government has promised the nation to present a fully digital country by 2021. This is currently buzzed as Vision 2021. To materialize this vision of a digital country, the government is greatly focusing on ITC development by opening various portal for public service and encouraging various types of e-commerce. To support and let people know about these services they could avail through the Internet (web) a fair was held at Nankin Bazar, Rajshahi on 9th September, 2015 as a part of the Bangladesh Internet Week celebration.

Mozilla has been developing tools to help people surf and use the web safely. But, in recent years it has focused on sharing and making on the web. In 2015, Mozilla has introduced a new Android application named Webmaker, which focuses on content sharing on the web, without any prior knowledge of programming or web page generating. The whole app works with simple touch gestures and drag ‘n drop. So, it’s pretty easy to use and almost everyone can use it.

A few days ago, Mahay Alam Khan Bhai and Belayet Bhai open called for volunteers to help in the kiosks around the country. From their tweets and Facebook posts, I came to know about this opportunity. Then, they organized us, and provided us with necessary tools. They also tried really hard to get the kiosks for the demonstration purpose. Luckily, we could manage a Kiosk for demonstrating the Webmaker App in BIW2015 Rajshahi.

Me and Papun bhai, reached the venue at around 9AM, while we were on the way, we thought we’d be late but it surprised us when we reached the venue we were the early birds. After finding our kiosk we were disappointed to see that, our kiosk had a misspelled tag, written “Mozila” on it. So, without any delay we called the authorities and I gave them a paper with the correct spelling. Then, I unwrapped the banners and started planning where to put all the banners and other stuff. After finding the sweet spot, I held the banners in position and Papun bhai secured them with tapes. After all banners were secured, we started counting and arranging our swags, stickers and pamphlets. Luckily by that time they had swapped the misspelled tag with the correct one.

At around 10 AM Istiaque bhai joned the party! By the time he joined us, all the exhibitors and other participants were called outside to witness the grand opening of BIW 2015 Rajshahi. There

Zunaid Ahmed Palak, Ministry of Post, Telecommunications & Information Technology, gave inspiring speech and lots of other thing.

At around 11AM, we got back to our Kiosk, this time with our Photographer Tumon bhai, his friend Fuad and another Mozillian Robin.

The stream of visitors were attracted to our kiosk as it was the first kiosk. So, God, we had to deal with a lot of people, a lot. From the very beginning our kiosk was almost full every minute. We had Six volunteers for demonstration and I don’t remember if I saw them sitting or being idle for a single minute. We were asking everyone to get their phone out and download the app then we encouraged them to open an account and made them familiar with the concept and idea behind Webmaker. Actually, I got a few interesting visitors, who wanted to go deep and I had to talk with them over 5 minutes. They asked about, how Webmaker is different from other online content sharing platforms like WordPress and Blogger. And many others wanted to know how to share, who can visit their makes, to whom these are visible, will their name will be removed if someone remixes their makes and tons of other interesting questions. We were giving away, awesome Webmaker stickers, whoever downloaded the app at our kiosk or could show the app installed in their phone! It was Awesome that, I was lucky enough that, one visitor, met me outside, after the fair, and showed me his first project, which were basically selfies with his buddies. The booth was so busy that our Photographer Tumon bhai actually got tired. So, I asked for his camera and told him to demonstrate the App while I took the Photos. The people who knew me and visited the fair cut jokes on me saying, “Hey, Mahir, from Developer to Photographer? What’s wrong with you man?”, I just smiled as I literary didn’t have anytime to talk with them unless they were the visitors of our kiosk.

At around, 1:30PM, We decided to split up for lunch and four of us, including me went for the lunch, while the others remained at the kiosk to demonstrate and welcome visitors. When we returned, the other party went for lunch. Surprisingly, they were able to attend 10 visitors by the time we were at lunch!

The event ended at 4PM, after rolling up everything, we headed for our home at 5PM with no energy left.

This event was great! With events like this, we can get into the mainstream lot easier. I think we should participate these kinds of events every time we get chance!